Netflix Eureka Server And Client Setup With Spring Boot
// BUILDING THIS WITH AN AI AGENT (2026)
Whether you are using Claude Code, Cursor, Windsurf, GitHub Copilot, Gemini Code Assist, Aider, or Cline — the productive pattern for production code in this space is: scaffold first, then ask for the idiomatic refactor. The prompt sequence:
- Scaffold. “Generate a basic working implementation. Don’t worry about elegance. Just get the happy path correct.”
- Ask for idiomaticity. “Refactor this to be idiomatic for the framework version I’m using. Specifically use [records / constructor injection / @Configuration / proper exception types / etc].”
- Test generation. “Add tests covering the happy path and 3 realistic edge cases. Use the testing conventions of the codebase.”
- Document the public API. “Add doc-comments on the public methods explaining what callers can and can’t assume.”
Agents are good at idiomatic code when you explicitly ask — they default to older patterns otherwise.
Overview
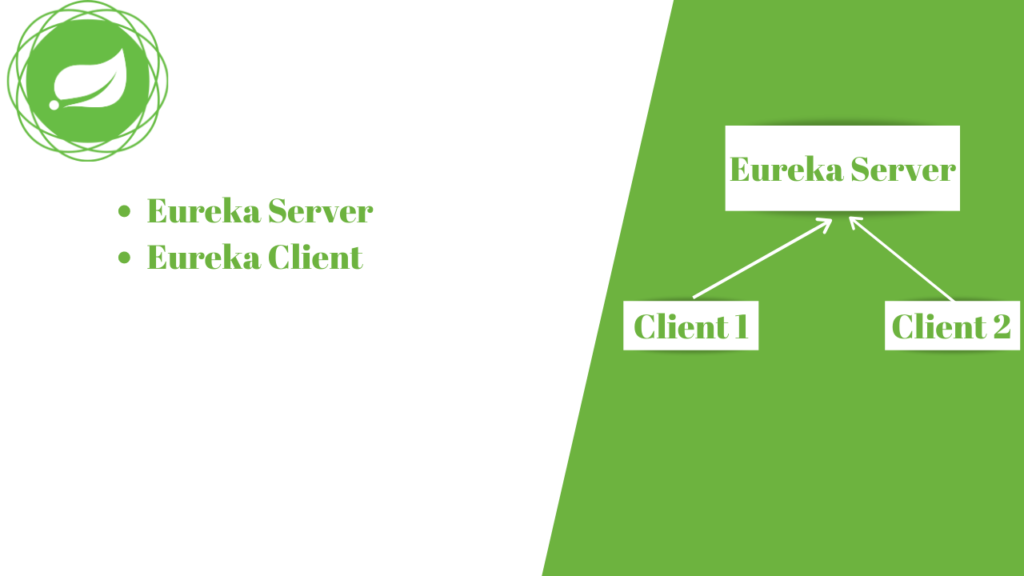
- We will set up a Eureka server (service registry used to register multiple services/microservices).
- We will set up multiple Eureka clients(REST services that register to Eureka Server).
- We will do client-side load balancing and service discovery through Eureka.
Setting up Eureka Server
The dependency required to set up a eureka server is “spring-cloud-starter-netflix-eureka-client” along with spring-boot-starter-parent. you can generate the code by going to https://start.spring.io/ , and provide the group id, artifact id and provide the required dependencies as shown below, and click on generate which will generate the sample code with dependency added to your pom.xml

The corresponding pom.xml should look like the below
<?xml version="1.0" encoding="UTF-8"?>
<project xmlns="http://maven.apache.org/POM/4.0.0" xmlns:xsi="http://www.w3.org/2001/XMLSchema-instance"
	xsi:schemaLocation="http://maven.apache.org/POM/4.0.0 https://maven.apache.org/xsd/maven-4.0.0.xsd">
	<modelVersion>4.0.0</modelVersion>
	<parent>
		<groupId>org.springframework.boot</groupId>
		<artifactId>spring-boot-starter-parent</artifactId>
		<version>2.2.3.RELEASE</version>
		<relativePath/> <!-- lookup parent from repository -->
	</parent>
	<groupId>com.example</groupId>
	<artifactId>eurekaserver</artifactId>
	<version>0.0.1-SNAPSHOT</version>
	<name>eurekaserver</name>
	<description>Demo project for Spring Boot</description>

	<properties>
		<java.version>1.8</java.version>
		<spring-cloud.version>Hoxton.SR1</spring-cloud.version>
	</properties>

	<dependencies>
		<dependency>
			<groupId>org.springframework.cloud</groupId>
			<artifactId>spring-cloud-starter-netflix-eureka-server</artifactId>
		</dependency>

		<dependency>
			<groupId>org.springframework.boot</groupId>
			<artifactId>spring-boot-starter-test</artifactId>
			<scope>test</scope>
			<exclusions>
				<exclusion>
					<groupId>org.junit.vintage</groupId>
					<artifactId>junit-vintage-engine</artifactId>
				</exclusion>
			</exclusions>
		</dependency>
	</dependencies>

	<dependencyManagement>
		<dependencies>
			<dependency>
				<groupId>org.springframework.cloud</groupId>
				<artifactId>spring-cloud-dependencies</artifactId>
				<version>${spring-cloud.version}</version>
				<type>pom</type>
				<scope>import</scope>
			</dependency>
		</dependencies>
	</dependencyManagement>

	<build>
		<plugins>
			<plugin>
				<groupId>org.springframework.boot</groupId>
				<artifactId>spring-boot-maven-plugin</artifactId>
			</plugin>
		</plugins>
	</build>

</project>
Once you have the project open the main Springboot Class with annotation @SpringbootApplication and add the annotation @EnableEurekaServer, the class should look like this.
package com.example.eurekaserver;

import org.springframework.boot.SpringApplication;
import org.springframework.boot.autoconfigure.SpringBootApplication;
import org.springframework.cloud.netflix.eureka.server.EnableEurekaServer;

@SpringBootApplication
@EnableEurekaServer
public class EurekaserverApplication {

	public static void main(String[] args) {
		SpringApplication.run(EurekaserverApplication.class, args);
	}

}
The last step in setting up the server is adding the application.yml file which will have eureka relate properties when you start the application with @EnableEurekaServer annotation it will look for bootstrap.yml file if not found it will look for application.yml file for the properties the yml file should look something like this.
server:
  port: 9090

eureka:
  client:
    register-with-eureka: false
    fetch-registry: false
    serviceUrl:
      defaultZone: http://localhost:9090/eureka/
The above properties yaml file defines the eureka defaultZone serviceUrl where eureka is supposed to run. register-with-eureka property is set to false as we don’t want to register Eureka Server to itself.
Once everything is the project structure should look like the below image

Go ahead and start the spring boot application, the eureka server should be up in whatever port you mentioned in application.yml file in this case eureka server will be up at localhost:9090 and will look like below.

Ola, we have set up the eureka server.
Now we will go ahead and create two clients named client1 and client2 from the spring initializer like the above with adding one more dependency Eureka Discovery Client, as shown below

Once we have both the projects created we will go ahead and add the annotation @EnableDiscoveryClient on the root SprintBootApplication class as shown below for both the clients Client1 and Client2
package com.example.client2;

import org.springframework.boot.SpringApplication;
import org.springframework.boot.autoconfigure.SpringBootApplication;
import org.springframework.cloud.client.discovery.EnableDiscoveryClient;

@SpringBootApplication
@EnableDiscoveryClient
public class Client2Application {

	public static void main(String[] args) {
		SpringApplication.run(Client2Application.class, args);
	}

}
Similarly, we need to update the application.yml file as below providing the required eureka config details.
spring:
  application:
    name: 'client1'
server:
  port: 8081

eureka:
  instance:
    hostname: ${vcap.application.uris[0]:localhost}
    prefer-ip-address: true
    lease-renewal-interval-in-seconds: 10
    lease-expiration-duration-in-seconds: 20
  client:
    service-url:
      defaultZone: http://localhost:9090/eureka
In the above code, we have provided the spring application name and eureka client service URL where the eureka server resides, so once you start the client it will look into the service URL and tries to register itself. The property lease-renewal-interval-in-seconds: 10 & lease-expiration-duration-in-seconds: 20 lets the Eureka Server when to check for the health of the client. Once you made these changes go ahead and start both the clients.
If you go back to Eureka Server you will now be able to see the two clients registered with names CLIENT1 and CLIENT2 as shown below.

Now the setup has been completed the two clients can talk to each with using the service discovery.
Here is the video tutorial explaining the same
For the AI-native engineering side of HackerHeap — building MCP servers, comparing agents (Claude Code, Cursor, Windsurf, Codex, Gemini, Copilot), and weekly working code — see the Friday Build newsletter and the MCP archive.